D21 Build Log

Nissan Navara Forum

Help Support Nissan Navara Forum:

This site may earn a commission from merchant affiliate links, including eBay, Amazon, and others.
I'm sorry to but in on your log Pro-Nav, but Ive got an answer for Mattd21.

No-one makes winchbars for our model Navara anymore, so unfortunately that only really leaves you with three options.

1. Change your front panels like Pro-Nav has done and get a brand new bar
2. Keep a real good eye out on Ebay for second hand ones, they are there occasionally but expect to pay the price of a new one.
3. Get someone to knock you up a custom tube winchbar similar to olgus69s', better aproach angles and looks heaps cooler too.
 
The mounts for a Pathfinder and Navara are identical, BUT the pathfinder body sits 50mm lower with relation to the chassis than the Navara, so you'll need to modify a pathfinder bar.

Yeah the snorkel data was part of my ongoing build logging so you don't have to worry about that, A-pillar snorkels are fine for everyone.

I'm not fitting a body lift because I don't especially like them, however, see if you can follow me on this: I'm fitting a body from a 4x2 to a 4x4 chassis and I needed a pair of mounts to weld to my 4x4 chassis. I took them from the 4x2 chassis but they're 50mm too short so I needed four lift blocks to make up the difference.

Body lifts for D21s, I think, are HARD. Unless you're buying from a kit. The reason is that you need M10-1.25x160 bolts which aren't sold in Australia.

They might be sold as part of kits, ask Zordo, he's a member on here. D22 mounts are similar so maybe you can use a D22 kit.

My tyres aren't much bigger than stock but I had no problem fitting them under my guards, from memory they were a bit marginal on the older guards though. I'm using the newer guards on the new body, yes.

No worries d21demon, I don't mind at all.
 
Last edited:
Forgot to mention, yes you can cut a larger (M12, etc) bolt down to the right size and thread on a lathe, but being a structural bolt, you're taking a risk cutting a thread. Rolled threads are much better, google it for details.
 
Hey pronav the conversion must slowly be feeling like you are actually going to drive this rig someday soon now, ha. Doing a good job too i must add, makes me wish i could get stuck into my rig.(just no damn time..) I was thinking of a body lift on mine purely for the reason of not having to wind up the torsions to their max, allowing some travel for clearance or bigger tyres. Anywho great job and im waiting for more updates,:big_smile:
 
Cheers olgus, yeah one of these days it might actually be drivable again... :big_smile::dong:
Be great to see your rig get even more unique too if you ever do find the time :top:

I'm giving a guy on eBay who sells bodylifts the specs of what is required to lift a D21, if you're all lucky a kit will appear in the future.
 
G'day Pro-Nav, been watching this build since the start and thought it about time I said "good on ya, nice work". From what I understand the D22 and D21 chassis are pretty much the same so do ya reckon the 22 lift kit will do the job?
 
Welcome along old man oz, thanks. The chassis are very very very similar but I can't bank on there not being something slightly different till someone confirms all the measurements for me.
 
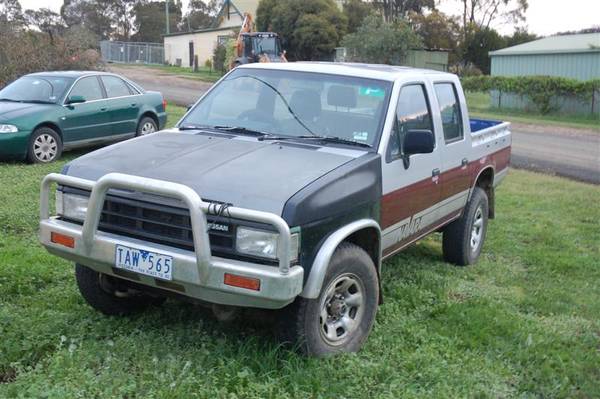
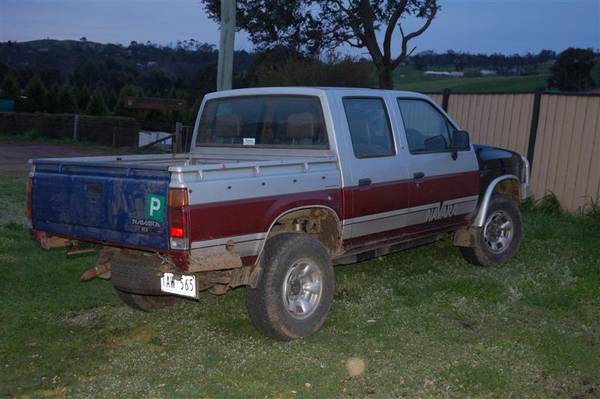
TA DA!

BuildLog001_017_Medium_.jpg


DualCab14_001_Medium_.jpg


I took it for an onroad and offroad test drive to try and bed everything in and find problems, hence it's dirty.

Only two problems, the brakes were locking on and staying on, but I think that's rusty pistons, it seems to be resolving itself gradually, and the child restraint bolt head is rubbing on the tray.

Going to try and get it to the engineer on Friday.
 
I think I can debrief the project now, although the engineer hasn't signed off on it yet.

I'd certainly do it again, BUT I'd do it differently in the following ways:

  • Use an engine crane from day one.

  • I'd have a fabrication shop make up some mounts which imitate the factory mounts, to mitigate the trouble involved in sourcing M10x1.5x160+ bolts, OR I'd buy some mount brackets from Nissan as they still have them in stock (ex Japan) but might not in future. I'm amazed they offer them as a spare part...
OR

  • Swap your running gear into an existing dual cab. Depending on your engineer's fees, the method I used can be considerably cheaper.
Here's what you NEED for the job if doing it on your own:

  • Engine crane.
  • Socket set 8mm - 20mm
  • Spanner set 8mm - 20mm
  • Screwdriver set
  • Torque wrench
  • Assorted other tools, nothing specific.
Here's what you WANT for the job if doing it on your own:

  • Gear spanner set
  • Concrete floor
  • Enclosed shed
  • Die grinder (for slotting holes)
The results:
BLISS. It's three times more quiet, comfortable and fun. I love it. The seats are awesome. It still looks like an absolute panelbeater special, coz it is, but it's better looking than the steel tray single cab. I recommend it thoroughly, but learn from my mistakes. BUDGET FOR AN ENGINE CRANE. $350, c'mon. I've used mine many times since for all sorts of stuff.
 
Nice work mate, bet you learn't a lot doing it. And no-one knows your truck like you do now.
 
Nice work mate, bet you learn't a lot doing it. And no-one knows your truck like you do now.

Cheers. Too right, I know where every redback spider lives......

Engineer is booked for Friday. Now I just need to decide what mod to do next.
 
Cheers Laith.

I had to abort the trip to the engineer; I got up onto the freeway and couldn't get past 3rd gear for all the brake drag. The longer the engine ran, the tighter the brakes got, to the point where even low 1st was a struggle and I had to have it in 4x4 just to get moving, even though I never touched the brake pedal. I needed to get off the freeway and back home, so I let off the line to the front brake circuit and had a wild ride with only rear brakes.

I just went for a drive to try and replicate the results, only to find it problem free. Was the primary cylinder in the wrong spot and releasing that pressure on the freeway fixed it? Dunno. When someone with legs becomes available I'll flush and bleed the primary loop. There's probably water in the line.
 
Okay, cracked the brake case. Turns out when I went from one firewall to the other, there were some small differences which resulted in the pushrod being maladjusted - it was too far in. Hence, the primary piston was in just the right spot to block off the return port, making the brakes accumulate pressure. Add to that the pressure valve was being pushed sufficiently to allow atmospheric pressure into the push side of the booster, meaning that the longer and faster the engine ran, the harder the brakes self-applied.

The simple fix was to back off the pushrod threaded adjustment till the clevis pin on the brake blade was free to slide easily side to side. Problem solved.

For the googlers, some keywords: disc brakes dragging locking primary circuit self applying
 
I just flushed and bled the brakes and it is AWESOME. Locks front first, then rear, just like it should, and crabs just slightly to the left at max braking. I rescheduled the engineer for tomorrow, then I'll go straight to VicRoads, and do the details change and I'm buying myself a new set of standard issue slimline plates as a reward. Would get some personalised plates but the $400 would be better spent on... well... anything.
 

Latest posts

Back
Top