You are using an out of date browser. It may not display this or other websites correctly.
You should upgrade or use an alternative browser.
You should upgrade or use an alternative browser.
Chris's OTHER D21 Thingo - It's a TERRANO (That's the Navara Wagon)
- Thread starter Chris_in_Ravenswood
- Start date

Help Support Nissan Navara Forum:
This site may earn a commission from merchant affiliate
links, including eBay, Amazon, and others.
Chris_in_Ravenswood
Member
Next, intercooler, exhaust and more booost....chris, i know a guy
Actually... As it happens... I intend to head over to your "laboratory where slow things go in and fast things come out" later this week.


Chris_in_Ravenswood
Member
Adding some dials and deleting the ashtray
OK, so I wanted to add a few dials:
I decided to combine these additions with the deletion of the ashtray.
I started with this:
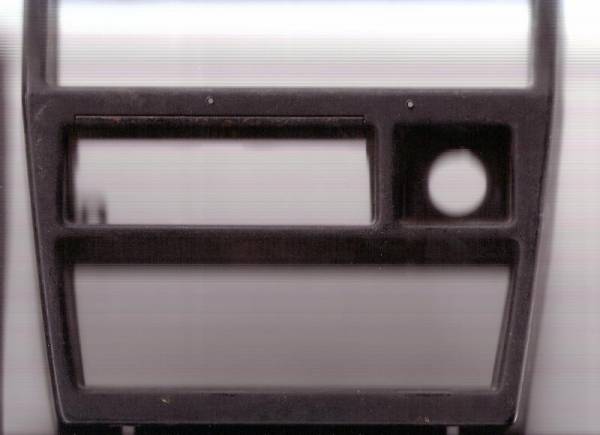
Then came up with a plan,
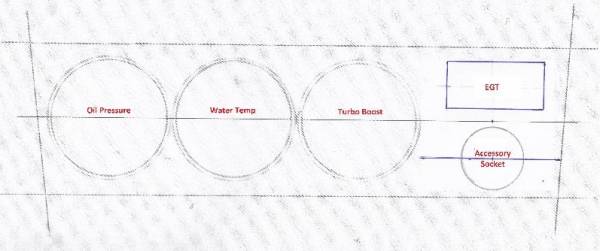
Made sure it would fit -
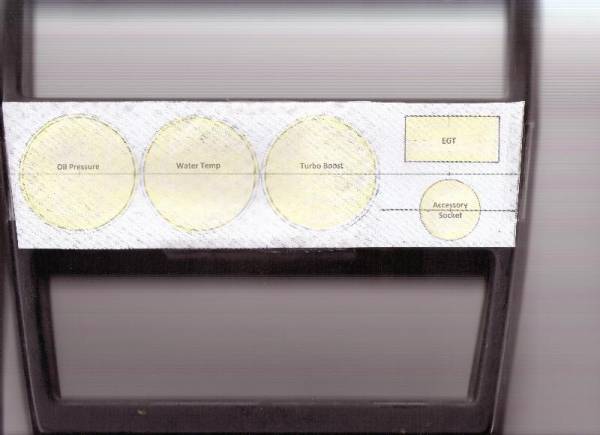
And built it -
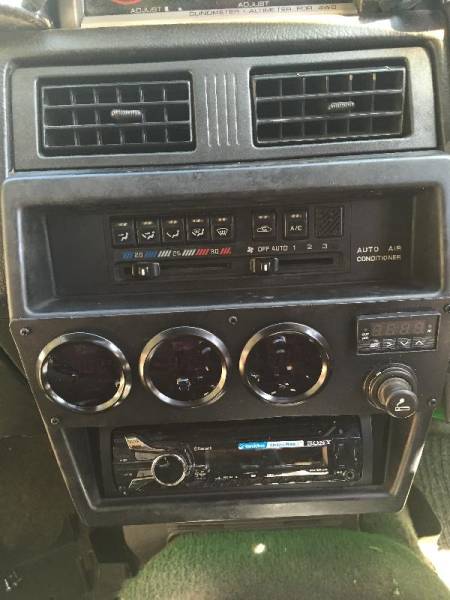
I'm quite proud of it. All I got to do is wire it all up.
I'm hoping that I'll be able to stop the spinney thing at the front from going bang, because of me being stupid.
OK, so I wanted to add a few dials:
- Oil Pressure
- Water Temperature
- Boost Pressure
- Exhaust Gas Temperature
I decided to combine these additions with the deletion of the ashtray.
I started with this:

Then came up with a plan,

Made sure it would fit -

And built it -

I'm quite proud of it. All I got to do is wire it all up.
I'm hoping that I'll be able to stop the spinney thing at the front from going bang, because of me being stupid.
D21-DX2.7D
Member
Nice work on the dash, your giving me ideas now
Chris_in_Ravenswood
Member
That's great!
Ha! - If I can give you an idea, that's great!
I have (stolen?) (borrowed?) COPIED, that's it...
I have copied so many ideas from so many people on this forum, it's about time I gave back.


Nice work on the dash, your giving me ideas now
Ha! - If I can give you an idea, that's great!
I have (stolen?) (borrowed?) COPIED, that's it...
I have copied so many ideas from so many people on this forum, it's about time I gave back.


Bearindabush
Member
Another project, wish I was there!
$63.00
Lift Ball Joint Fit forNissan NAVARA D40 2005-2014 / Navara NP300 D23 2015-2023 / Frontier 2005-2021
Great Automotive Technology Guangzhou Co., Ltd

$143.99
Car Cover, for Nissan Navara 2016 Indoor Outdoor All Season Resistan Breathable Sun Protection Windproof, Auto Accessories,A-Black-Normal
DATONGSHIPINGCHENGQUDAYUANBAIHUODIANGERENDUZI
Chris_in_Ravenswood
Member
Thank you, my friend!
Hi mate,
Sorry it has taken me so long to reply -
ME TOO!!!
I could often do with a hand from a friendly (and competent) spanner-twiddler.
Couldn't be bothered to do any of the (nearly) 600 items on my to-do list today so, guess what I did???
I remembered what it looked like when it came back from the Mundaring Powerlines -
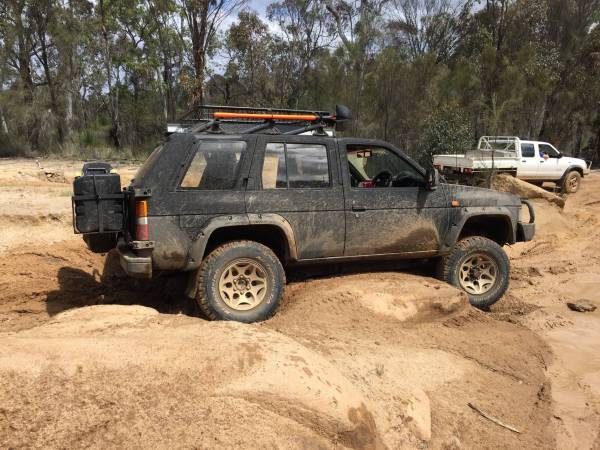
(OK, so I beached it.... Sitting on the chassis, with the wheels in the air.
All I needed was a helpful chap with a winch.
Good job I brought one along with me!)

Yep - I washed it...
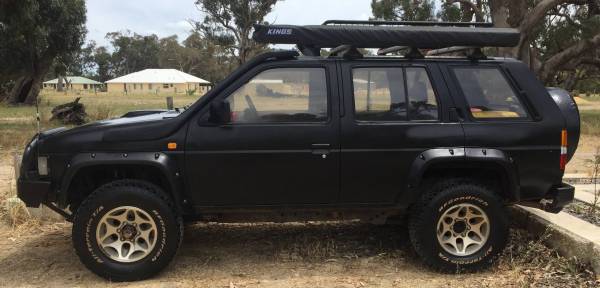
Seriously - I ACTUALLY WASHED IT!!!
Another project, wish I was there!
Hi mate,
Sorry it has taken me so long to reply -
ME TOO!!!
I could often do with a hand from a friendly (and competent) spanner-twiddler.
Couldn't be bothered to do any of the (nearly) 600 items on my to-do list today so, guess what I did???
I remembered what it looked like when it came back from the Mundaring Powerlines -

(OK, so I beached it.... Sitting on the chassis, with the wheels in the air.
All I needed was a helpful chap with a winch.
Good job I brought one along with me!)

Yep - I washed it...

Seriously - I ACTUALLY WASHED IT!!!
Last edited:
Yep - I washed it...

Seriously - I ACTUALLY WASHED IT!!!
BLACK

Thought she was grey

Looking the goods
Chris_in_Ravenswood
Member
A quick update.
I haven't posted anything for AGES...
Been too busy doing bits and pieces to the truck.
Here's a list:
OK - I think that's it.
If I find any pictures worth posting, they will come next.


I haven't posted anything for AGES...
Been too busy doing bits and pieces to the truck.
Here's a list:
- 3" Body lift, including engineering requirements of replacing the standard 10mm dia grade 6 bolts with 12mm dia grade 8.8 HT bolts, among many other requirements.
- Removed the C200 rear axle and replaced with an H233b, "Banjo-style" axle.
- Replaced the rear drums with disks (with drum handbrake).
- Replaced the factory airbox and filter with one from a Toyota 70 series. Still need to get a decent top-hose for this as the one I bodged up is just that - bodged up...
- High-flow turbo dump pipe and 2.5" exhaust (mated back into the standard rear box - ran out of time).
- Replaced the torsion bars with Ironman NISS017's.
- Replaced the rear springs with Ironman NISS018B's.
- Replaced the front top and bottom balljoints.
- Replaced both front drive shafts/CV's.
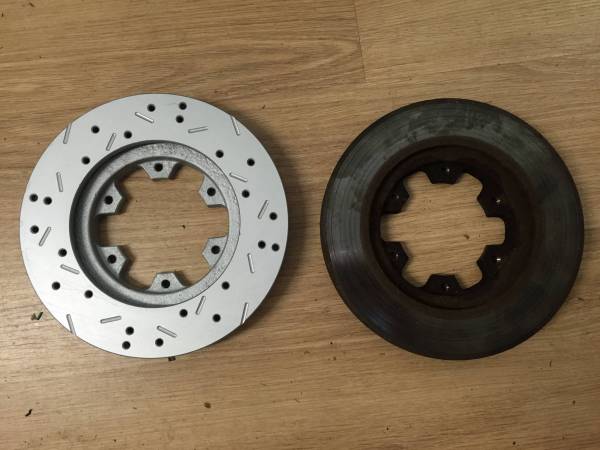
- Replaced both front brake rotors with vented, drilled and slotted.
- Fitted a turbo boost controller.
- Fitted a new UHF and antenna.
- Replaced sunroof with one that didn't leak.
OK - I think that's it.
If I find any pictures worth posting, they will come next.


Chris_in_Ravenswood
Member
Forgot to mention...
Missed a couple of bits:

Missed a couple of bits:
- Fitted a "Headlight switch saver" loom. (This is a plug-and-play add-in wiring loom that stops you burning out the light switch on the steering column stalk, by adding in a pair of relays).
- Replaced leaky radiator with new, copper core, radiator.
- Replaced water pump.
- Replaced all belts and hoses.

Chris_in_Ravenswood
Member
Pics 1
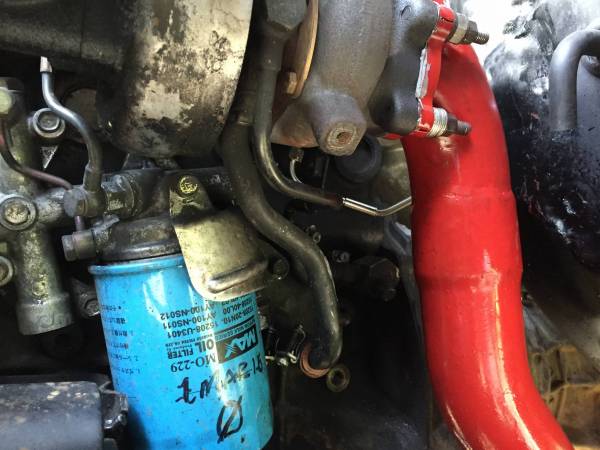
Dump pipe / Exhaust upgrade (Thanks Christian)
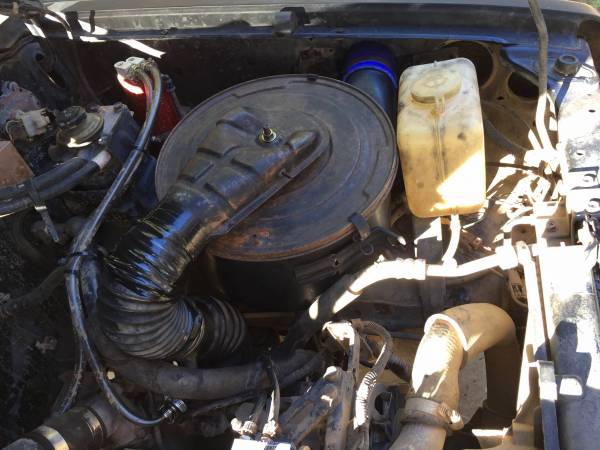
Toyota filter housing. Straight out of the snorkel and into the filter. The output pipe will be replaced as soon as I am sure how I want it to be...
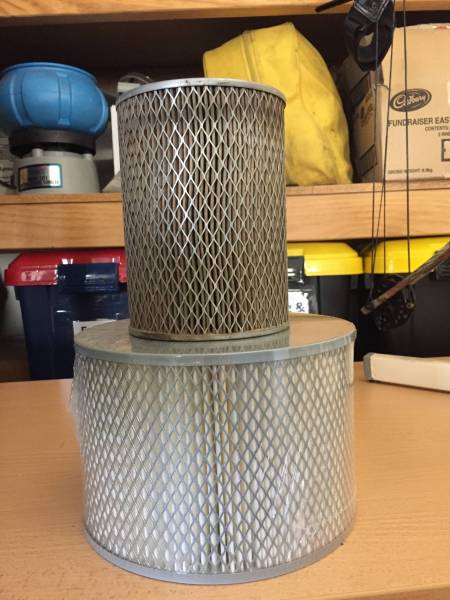
This is how much bigger the filter is - Original Nissan on top, new Toyota A340 filter underneath -
Dump pipe / Exhaust upgrade (Thanks Christian)

Toyota filter housing. Straight out of the snorkel and into the filter. The output pipe will be replaced as soon as I am sure how I want it to be...

This is how much bigger the filter is - Original Nissan on top, new Toyota A340 filter underneath -

Chris_in_Ravenswood
Member
Pics 2
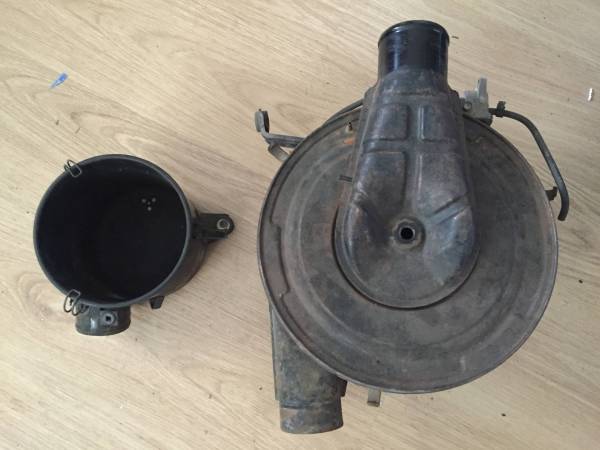
This gives you an idea of just how big the Toyota housing is, when compared to the Nissan -
The new rotors, compared to the old ones -
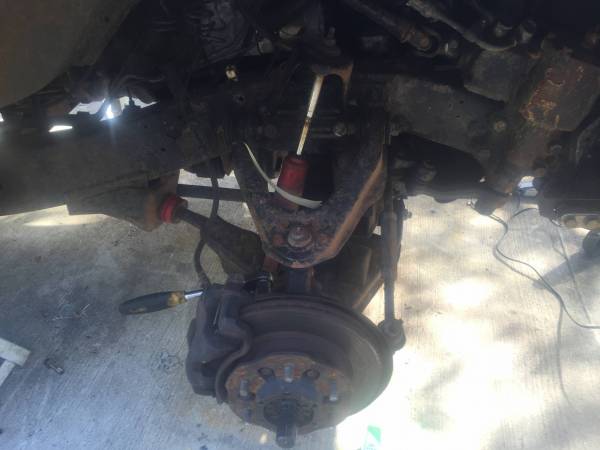
This is what the front-end looked like before I started -
... and after -
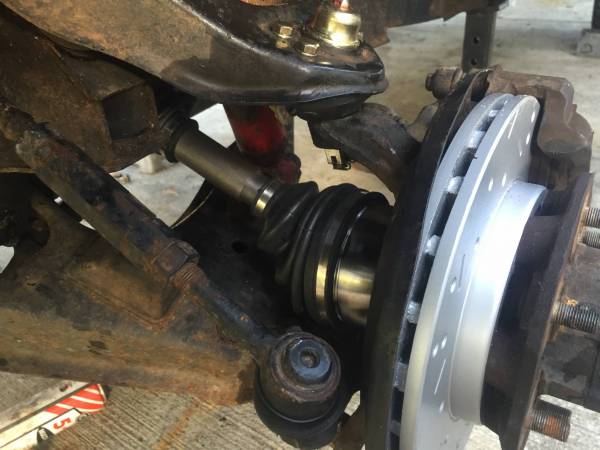
New Rotors, new upper and lower ball joints and new driveshafts/CV's.
This gives you an idea of just how big the Toyota housing is, when compared to the Nissan -

The new rotors, compared to the old ones -

This is what the front-end looked like before I started -

... and after -

New Rotors, new upper and lower ball joints and new driveshafts/CV's.
Chris_in_Ravenswood
Member
Why the Toyota filter?
There are a few reasons for this...
In my search for more boost, I discovered that, if I popped off the air filter box cover, I gained 3PSI. This suggested that there was a restriction in the intake. I figured it was the snorkel, but finally discovered what the problem was once I took the wing off.
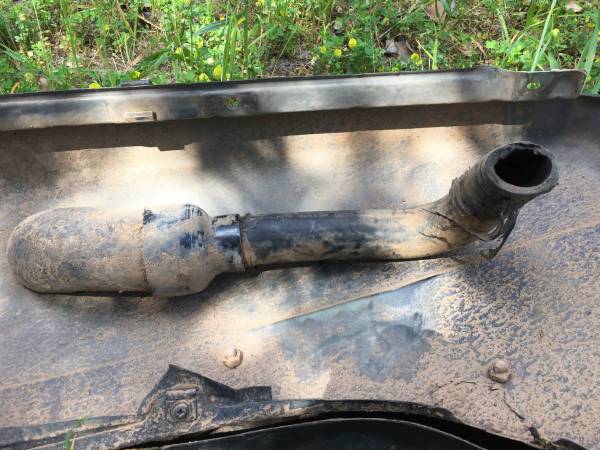
The 3" pipe that comes out of the snorkel was reduced down using a metal reducing collar. Into this, a rubber hose had been attached with Sikaflex. It turned out that the hose was a top radiator hose and offered less than 1.5" diameter...
SO..
That started it.
I had already purchased a Toyota air box (I had planned on putting on my Nav, but then I sold it), so it came into play. 3" out of the snorkel, right angle, straight into the 3" intake pipe of the air filter.
That has upped the boost to offer me up to 6PSI over what I had!!!
Woo Hoo...
There are a few reasons for this...
In my search for more boost, I discovered that, if I popped off the air filter box cover, I gained 3PSI. This suggested that there was a restriction in the intake. I figured it was the snorkel, but finally discovered what the problem was once I took the wing off.

The 3" pipe that comes out of the snorkel was reduced down using a metal reducing collar. Into this, a rubber hose had been attached with Sikaflex. It turned out that the hose was a top radiator hose and offered less than 1.5" diameter...

SO..
That started it.
I had already purchased a Toyota air box (I had planned on putting on my Nav, but then I sold it), so it came into play. 3" out of the snorkel, right angle, straight into the 3" intake pipe of the air filter.
That has upped the boost to offer me up to 6PSI over what I had!!!

Woo Hoo...
Chris_in_Ravenswood
Member
Back Axle
Those of you that may have seen my posts for my Navara, might remember that I broke the back axle in that one. That was an H233b.
When I looked underneath my new Terrano, I discovered that it had a
C200 Axle (with an open centre) and drum brakes.
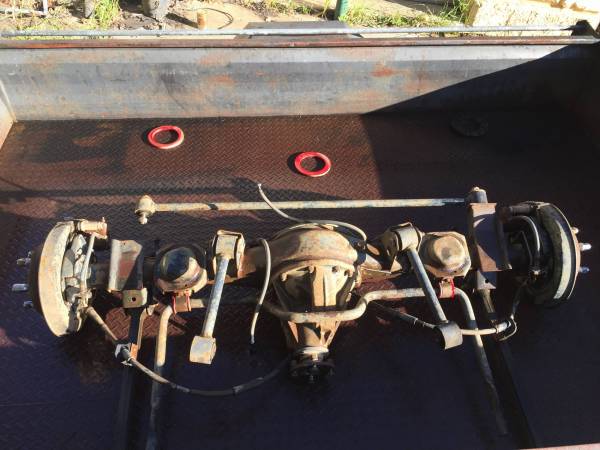
Thanks to CWOLF, I picked up exactly the axle I was looking for.
H233b in the correct ratio, LSD (working, too), disc brakes and calipers, all for a very reasonable price.
This is what the old axle looked like:
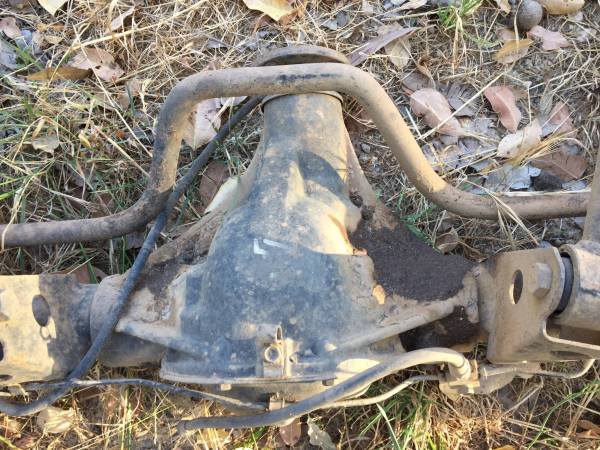
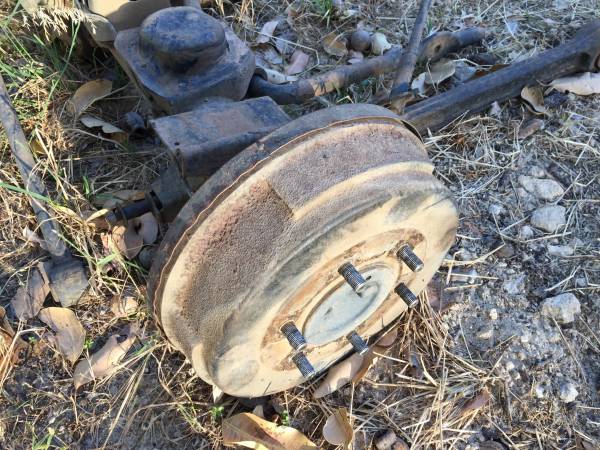
And here is the new one, waiting to go in:
Dropped the oil and the magnet didn't have much metal on it. Fresh LSD oil and all was good to go.
Bolted straight in and connected up just fine.
That's got to be better and stronger...
Those of you that may have seen my posts for my Navara, might remember that I broke the back axle in that one. That was an H233b.
When I looked underneath my new Terrano, I discovered that it had a
C200 Axle (with an open centre) and drum brakes.

Thanks to CWOLF, I picked up exactly the axle I was looking for.
H233b in the correct ratio, LSD (working, too), disc brakes and calipers, all for a very reasonable price.
This is what the old axle looked like:


And here is the new one, waiting to go in:

Dropped the oil and the magnet didn't have much metal on it. Fresh LSD oil and all was good to go.
Bolted straight in and connected up just fine.
That's got to be better and stronger...
Chris_in_Ravenswood
Member
Drinks, anyone?
Anyone that owns a Terrano will know that there is NOWHERE to put a drink.
What a dumb decision!
My centre console is a great place to store all of the little bits that need to come 4x4'ing, but they have a tendency to jump out when the going gets interesting.
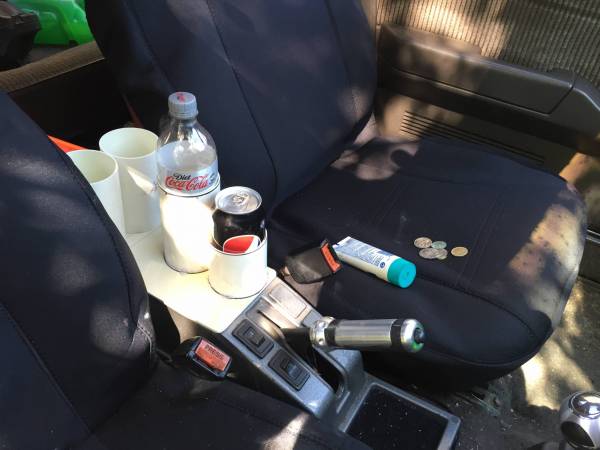
I decided to put a lid on it and add a cup holder or two into the bargain.
I grabbed a bit of 130mm waste pipe, chopped it up, cut it lengthways and stuck it in the oven to get warm. Once it was soft, I put a flat sheet of steel on it to hold it flat and turned off the oven.
Result? I had a 3mm piece of flat plastic that the green solvent will let me bond stuff to. I cut this to the shape of the lid I wanted, but a little longer than the bin it covers.
I hot glued some 75mm pipe to the top - 2 for the rear passengers and two for the front, with the one at the front being shorter to save my elbows when shifting into 2nd or 4th.
I added a class breaker / seatbelt cutter and used it for a couple of trips.
From the front:
From the rear:
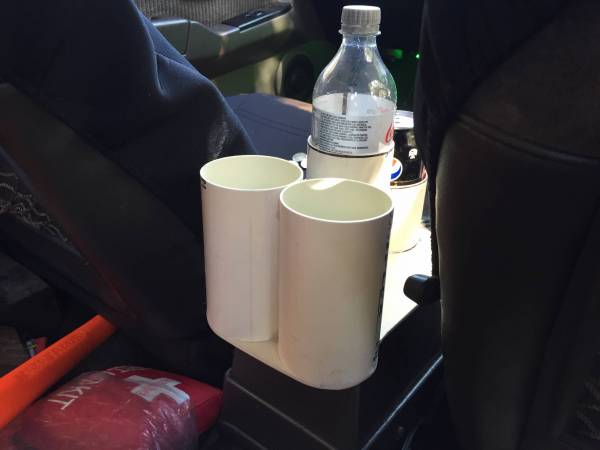
All was well, so I removed the hot glue and solvented the 75mm pipes to the flat sheet and painted it black.
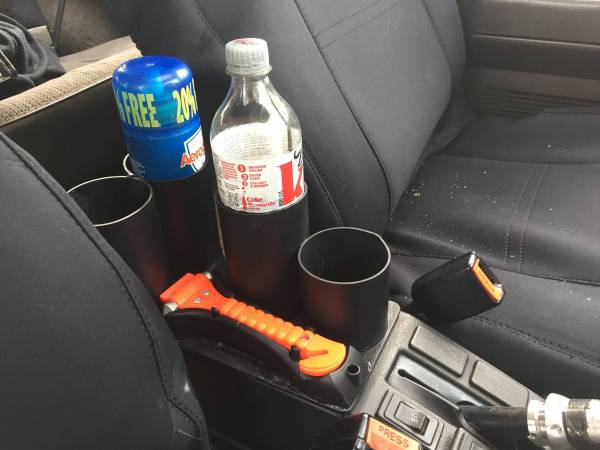
A hinge near the back and a magnetic catch in the front means that I can still store all of my rubbish in there AND still get to it if I ever need to!
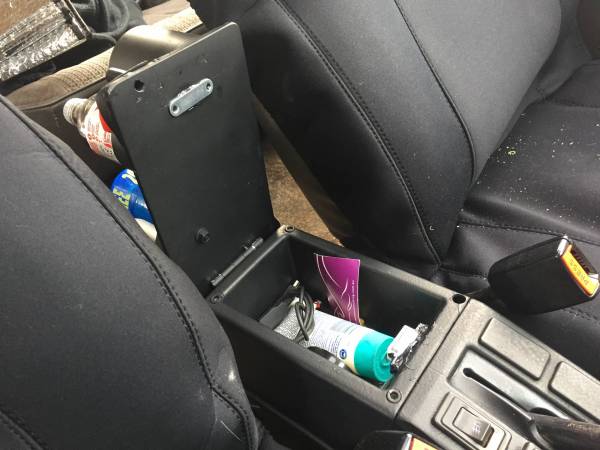
Used it a few times since and it works GREAT!
Anyone that owns a Terrano will know that there is NOWHERE to put a drink.
What a dumb decision!
My centre console is a great place to store all of the little bits that need to come 4x4'ing, but they have a tendency to jump out when the going gets interesting.
I decided to put a lid on it and add a cup holder or two into the bargain.
I grabbed a bit of 130mm waste pipe, chopped it up, cut it lengthways and stuck it in the oven to get warm. Once it was soft, I put a flat sheet of steel on it to hold it flat and turned off the oven.
Result? I had a 3mm piece of flat plastic that the green solvent will let me bond stuff to. I cut this to the shape of the lid I wanted, but a little longer than the bin it covers.
I hot glued some 75mm pipe to the top - 2 for the rear passengers and two for the front, with the one at the front being shorter to save my elbows when shifting into 2nd or 4th.
I added a class breaker / seatbelt cutter and used it for a couple of trips.
From the front:

From the rear:

All was well, so I removed the hot glue and solvented the 75mm pipes to the flat sheet and painted it black.

A hinge near the back and a magnetic catch in the front means that I can still store all of my rubbish in there AND still get to it if I ever need to!

Used it a few times since and it works GREAT!
Chris_in_Ravenswood
Member
Jack holder
I have a bit of a freak out whenever I see small, heavy items unsecured in 4x4's that bounce around over rocks.
I wanted somewhere safe to store my bottle jack.
I found the perfect place!
The spare wheel carrier (across the tailgate) has a large bit of pressed steel to hold the wheel.
I first added a "top" to it out of some 1.8mm scrap - Here it is, tacked in:
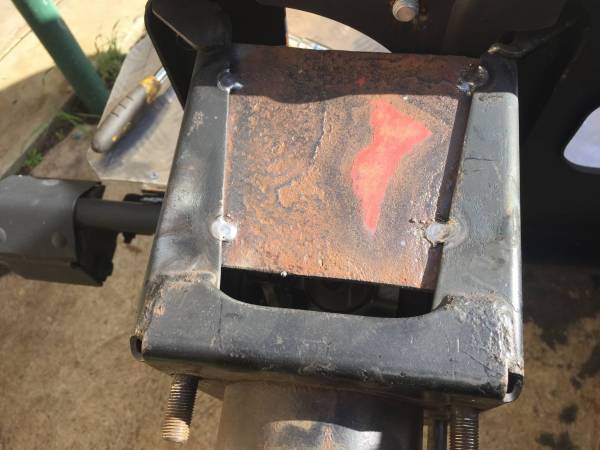
and then built up the bottom, with 2 bits of angle and another plate:
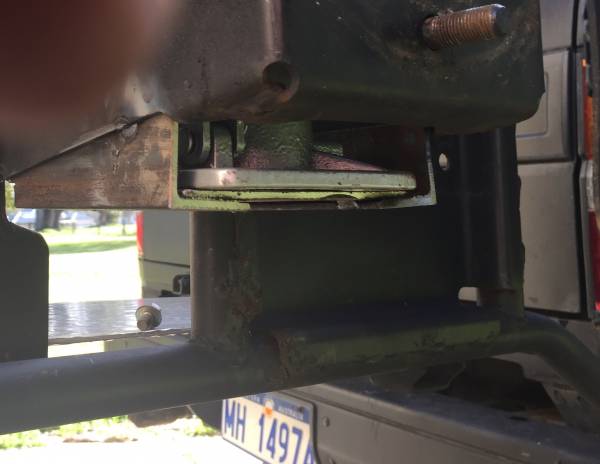
Welded it up, cleaned it up and painted it.
By trimming a little meat out of the vertical strip (that holds the nuts the wheel carrier bolts to), the jack fits in just fine.
I glued a piece of rubber in the bottom, inserted the jack, jacked it up until it gripped the top and bottom of the box I had created and it's great!
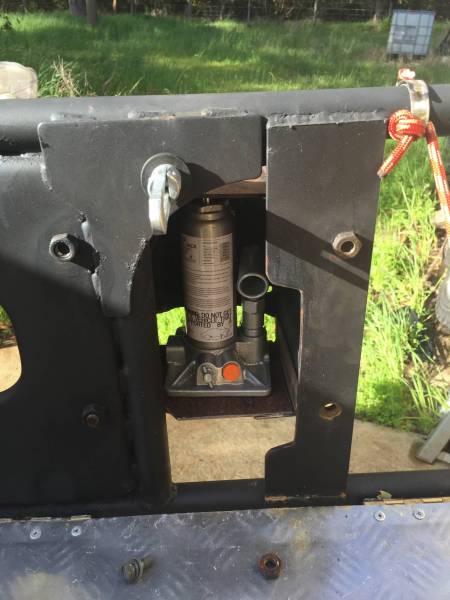
I have a hinge-down shelf (for my camp cooker) that closes over this (see it, with the nut and bolt on it, as well as the silver clip at the top that holds it closed) so, even if the jack comes loose, the worst it can do is rattle.
I have a bit of a freak out whenever I see small, heavy items unsecured in 4x4's that bounce around over rocks.
I wanted somewhere safe to store my bottle jack.
I found the perfect place!
The spare wheel carrier (across the tailgate) has a large bit of pressed steel to hold the wheel.
I first added a "top" to it out of some 1.8mm scrap - Here it is, tacked in:

and then built up the bottom, with 2 bits of angle and another plate:

Welded it up, cleaned it up and painted it.
By trimming a little meat out of the vertical strip (that holds the nuts the wheel carrier bolts to), the jack fits in just fine.
I glued a piece of rubber in the bottom, inserted the jack, jacked it up until it gripped the top and bottom of the box I had created and it's great!

I have a hinge-down shelf (for my camp cooker) that closes over this (see it, with the nut and bolt on it, as well as the silver clip at the top that holds it closed) so, even if the jack comes loose, the worst it can do is rattle.
Chris_in_Ravenswood
Member
Cooker tray
Copied from CWOLF.
Keeps food out of the back, the tailgate acts as a roof when its raining and all of the food bits get swept on the floor at the end.
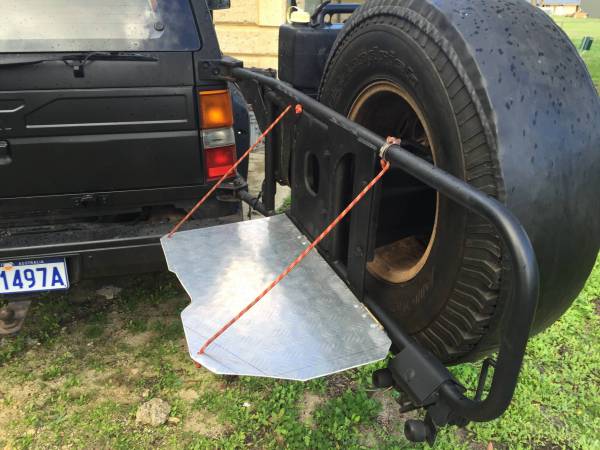
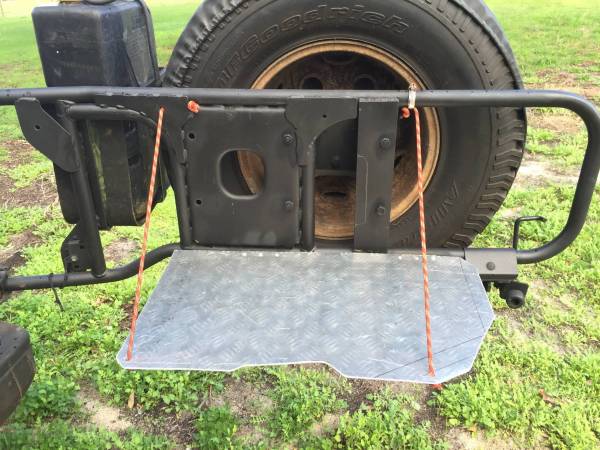
The "odd shape" at the right hand side just happened to be the shape of the offcut I used.
The curved cutout (nearest to where you would stand while cooking) ensures it misses the rear wiper when stowed.
In these pictures, I hadn't cut the jack access out (but it is marked), neither had I fitted the clip to hold it up when stowed.
Simple as.
Copied from CWOLF.
Keeps food out of the back, the tailgate acts as a roof when its raining and all of the food bits get swept on the floor at the end.


The "odd shape" at the right hand side just happened to be the shape of the offcut I used.
The curved cutout (nearest to where you would stand while cooking) ensures it misses the rear wiper when stowed.
In these pictures, I hadn't cut the jack access out (but it is marked), neither had I fitted the clip to hold it up when stowed.
Simple as.
Bearindabush
Member
Top stuff mate, love ya work!
Chris_in_Ravenswood
Member
Thanks!
 Cheers for the encouragement. It wasn't the same, building this one without you!!!
(I still have a LONG WAY TO GO, before it's finished)
Top stuff mate, love ya work!
 Cheers for the encouragement. It wasn't the same, building this one without you!!!
(I still have a LONG WAY TO GO, before it's finished)

Dump pipe / Exhaust upgrade (Thanks Christian)

Toyota filter housing. Straight out of the snorkel and into the filter. The output pipe will be replaced as soon as I am sure how I want it to be...

This is how much bigger the filter is - Original Nissan on top, new Toyota A340 filter underneath -

oh goodness i haven't been on this forums in months! the D22s been of the road for about 6 months and ive been ignoring her.
good to see your still getting into your terrano !
How is she running now? will have to catchup sometime soon (hows tuesday i need to put the gearbox back in the d22
Similar threads
- Replies
- 11
- Views
- 4K
- Replies
- 5
- Views
- 4K


