Help with wiring Carling type switch

Nissan Navara Forum

Help Support Nissan Navara Forum:

This site may earn a commission from merchant affiliate links, including eBay, Amazon, and others.

shaunv8

Member
Joined
Apr 29, 2014
Messages
101
Reaction score
0
Location
Perth WA
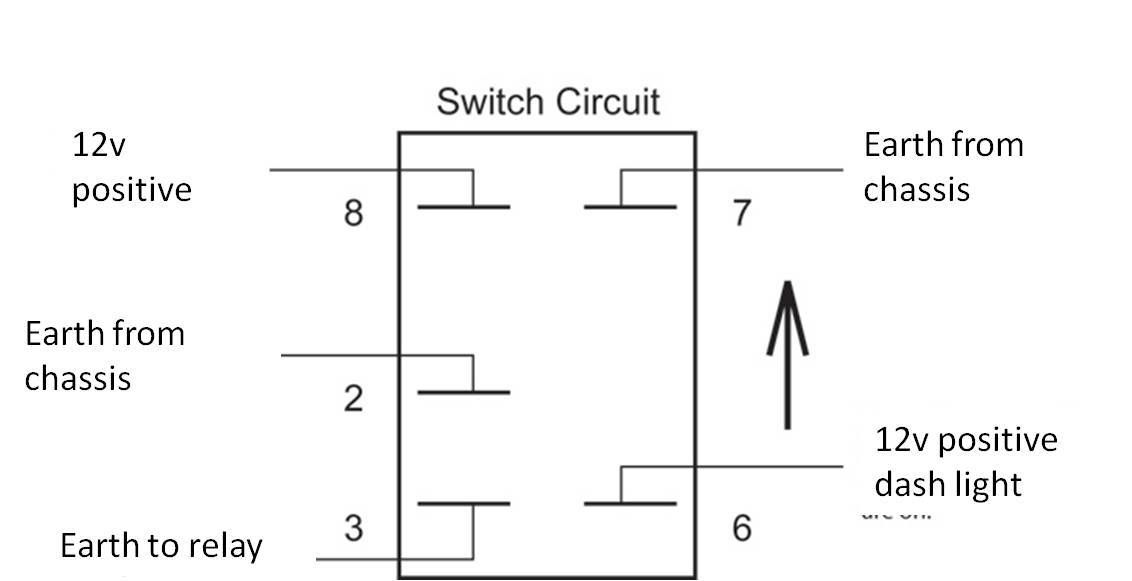
Hi All, I have a set of spotties on my car and the way they have been wired up is by switching the negative on the relay, rather than high beam feed. Now I wanna wire up a carling switch and have the lights of the switch working as they should. I have been racking by brain and come up with the below. Will this work? I have also included the original wiring diagram Thanks


Hello Shaun, find the high active wire and run that to the trigger point of the relay. Earth your negative and run GOOD cable to the lights via the relay. I think on an ordinary relay it is terminals 85, and 86.Legally you must wire into the h/b
 
Last edited:
Hi All, I have a set of spotties on my car and the way they have been wired up is by switching the negative on the relay, rather than high beam feed. Now I wanna wire up a carling switch and have the lights of the switch working as they should. I have been racking by brain and come up with the below. Will this work? I have also included the original wiring diagram Thanks


Hey mate. If the first picture is how you want to wire them, that will work fine. I did the same for mine as I have spot light and light bar switches. I used the high beam trigger from in the steering column for the 12v input, then chassis ground and relay ground, as you have in the diagram.

The lights in the switches work as they should, on when the switch is in the on position with high beam active, off when high beam or switch turned off.
 
Thanks, yes the h/b need to be on for the spotties currently. The current wiring is done this way as there are 2 x sets of lights and 1 x on-off-on switch (one set of lights being parkers in the spotties) so thats why the negative is the switch.
 
Hey mate. If the first picture is how you want to wire them, that will work fine. I did the same for mine as I have spot light and light bar switches. I used the high beam trigger from in the steering column for the 12v input, then chassis ground and relay ground, as you have in the diagram.

The lights in the switches work as they should, on when the switch is in the on position with high beam active, off when high beam or switch turned off.

Thanks mate, yes, the first pic is how I want wire it, so both upper and lower lights in the carling switch work as they should :)
 
Yep that will work fine. I didn't want to have to run a heap of new wiring through the firewall when i put the switches and light bar on lol. So u just used twin core for the relay earths and did the switches like that. Been fine for over a year now...
 
I'm going to assume that the switch is a double pole single throw, and the upper links in the diagram are NOT switched by the switch. If they are switched, then when you flick the lever down, the chassis earth will connect with the 12V feed and blow the fuse (or start a fire if you forgot the fuse).

The original wiring actually sounds right. Your relay has (usually) 4 poles on it. Two of these are for triggering the relay and are usually numbered 85 and 86. The other two are for the fused power source (usually numbered 30) and the output (usually numbered 87). If you have a relay with 5 pins, it will have a pin numbered 87a as well, and this is OFF when your the relay is active and ON when it's not. Don't use pin 87a normally - but the relay itself is fine to use in this situation.

Knowing how a relay works helps too. Positive to either 85 or 86 - and negative to the other. Let's say positive to 86 and negative to 85. Doesn't matter which way around it goes, it's just a coil that operates the relay (which really is just a switch). Can go either way, who cares. If you connect 86 to the headlight high beam wire (which obviously only comes on when high beam is on) and the other to negative, the relay will come on whenever high beam is on. With pin 30 to a fused positive source, and pin 87 going to your driving lights, your driving lights will come on whenever your high beam is on.

Now, to make it a little nicer, don't earth pin 85 straight away. Bring one wire in from pin 85 to the cabin on to one side of the switch. Connect a short lead from the middle of the switch to earth. Now, when high beam is on, the driving lights will only come on when that switch is on. If the high beam is on and you turn the switch off, your high beam stays on but the driving lights switch off. The switch turns the driving lights on and off but they'll ONLY work when high beam is active. And the law likes it working like that too.

I hope that's clearer. If your switch has lights inside it, you might need to work a little magic, especially if those lights are LED-based, because LEDs need a particular orientation (positive on one leg, negative on the other) in order to work.

You have totally lost me. I dont have a problem with the relays they are wired up, Im trying to figure out a way to put the carling switch in the cab, using the EARTH as the switch, while having the lights in the switch work correctly :)
 
Ok, so if the relays are working, it's just the switch.

Trouble with the switches - the manufacturers assume that they're usually positive-switching so if it's an LED inside the switch, you won't get it to work on a negative-switching scenario like you have. It will expect positive on the centre pole and negative on the small lead (because LEDs don't work when you connect them backwards). Try it, if the switch doesn't light up it's probably an LED. Try connecting it the other way with test leads - if that works, there are options available.

The way around THAT and still keep your wiring is still simple if you can disassemble the switch and flick the LED around the other way. There is another alternative if the switch can't be disassembled.

Wire your switch in with a positive centre, positive on the output pin and negative on the bulb pin, then feed this to a new relay inside the cabin, to pin 85. Connect pin 86 to ground, along with pin 30. Connect pin 87 to the wire heading out to the relay in the engine bay. It's messy, really, but it will work. You'll hear a click every time the switch comes on (even if the driving lights are off - remember it's the relay in the engine bay that's bringing the driving lights on when high beam is on).
If it's a genuine carling switch, it will have a normal incandescent globe in it. The Chinese rip offs with leds in them only have 1 input for the parking light section and an earth. The light inside the switch side gets power when the switch is turned on.
 

Latest posts

Back
Top